|
 |
|
 |
|
| Autor |
Nachricht |
g_boxwood

Anmeldungsdatum: 08.06.2006
Beiträge: 172
|
 Verfasst am: Fr 28 Mai 2010, 11:53 Titel: Airframe configuration for ARRD Verfasst am: Fr 28 Mai 2010, 11:53 Titel: Airframe configuration for ARRD |
 |
|
Dear gentlemen,
I've been working on some pictures for my local club about the ARRD setup and I thought I could share them here as well.
I'll document what I came up with a few years ago for my Big Nuke L2 bird and I'll take a step forward from that airframe configuration.
As you may already know, the device referred to as "ARRD" allows to eject both the pilot/drogue and the main chutes from the same airframe end.
Doing so has the following advantages:
1. the airframe may be split in one point only, making it stronger
2. the rocket has a less chaotic descent
3. the rocket points in the same direction duting the entirity if the descent and it helps with videos and/or pictures
4. ejection charges are cut to a minimum as only the apogee event charge is used (the amount of BP that fills the ARRD is negligible)
The airframe main section, however, needs some more organization with respect to the standard dual deployment.
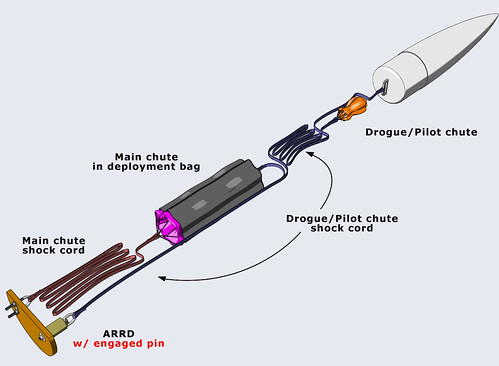
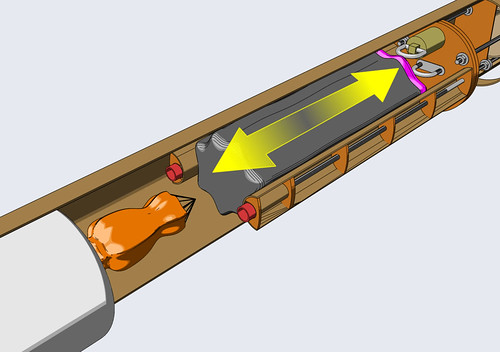
Here is the recovery system layout.

Starting from the bottom:
. the bulkplate with the main line U-bolt and the ARRD
. main shock cord and main chute inside its deployment bag
. pilot shock cord is split at A and at B: split "B" connects it to the main deployment bag, split "A" connects it to the nosecone
It is worth noting that:
. dual-deployment-from-single-compartment requires a SEQUENTIAL setup, i.e. whatever leaves the airframe first should be packed close to the top
. time separation of apogee and main event is the yellow line in the picture; time separation implies physical separation of the items pertaining to each event
. red arrow is apogee event and shows what's going to be ejected at that time
. yellow arrow is main event
Let me try to simulate what happens.
Flight
The entire recovery system is packed as it is, the rocket is coasting toward apogee.
Apogee

Apogee ejection charge fires out the ifollowing items: nosecone, drogue/pilot chute and relevant shock cord.
To do so, the BP charge shall be placed at the bottom of the items that are supposed to be ejected.
More on this later
From apogee to main
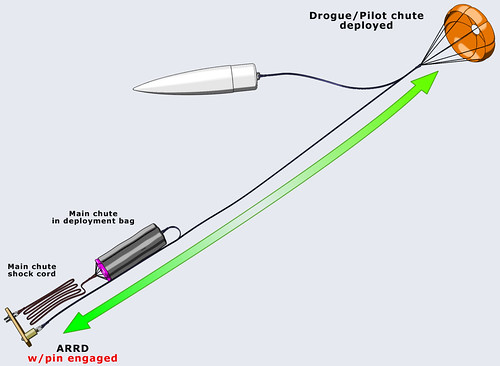
During the descent, the drogue is firmly tied to the bulkplate through the ARRD: the ARRD behaves like a regular U-bolt and the drogue shock cord transfers all the chute tension to the bulkplate (green arrow).
Main event
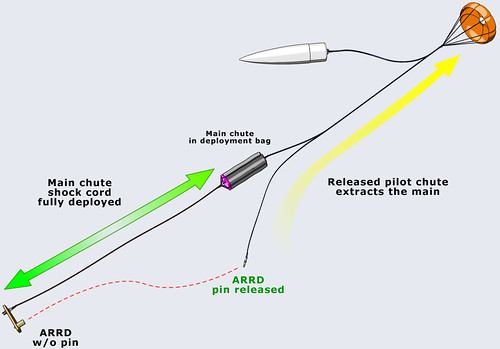
The ARRD pin is release by the altimeter main pyro output.
the dorgue/pilot pulls the main deployment bag out stretching the main shock cord and shroud lines all the way out (green arrow again).

Extraction by thed doruge continues and it allows the main to inflate gradually without too much pain in the recovery system costraints.
The deployment bag separates from the main ("free bag" configuration) and the drogue becomes the nosecone recovery system.
Here are some "rules" that may lead tio a successul deployment:
1. place the apogee BP charges at the base of the recovery items that are fired at apogee
2. drogue/pilot shall be the right size to allow the nosecone to float back to ground at a reasonable vertical speed
3. use the "free bag" configuration, do not attach the deployment bag to the main chute apex
_________________
Giacomo 'g_boxwood' Bosso
TRA#9986 L2 |
|
| Nach oben |
|
|
|
 |
|
 |
|
|
|
|
| Autor |
Nachricht |
g_boxwood
Anmeldungsdatum: 08.06.2006
Beiträge: 172
|
| Verfasst am: Fr 28 Mai 2010, 11:53 Titel: |
|
|
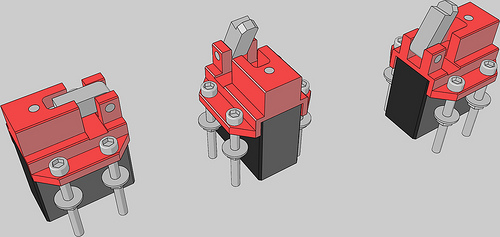
Here it is a fast and common way to place the apogee BP charges at the base of the recovery system items to be ejected:
1. those channels bring the BP canisters on top of the main chute deployment bag
2. the deployment bag shall fit loosely inside the airframe and it shall be pulled away with very little effort
Here is the setup before the Nuke second flight:


. the red line is the main's and it goes to the U-bolt
. the black line is the dorgue's and it goes to the ARRD
. the charges are in place
. the recovery system is packed next
_________________
Giacomo 'g_boxwood' Bosso
TRA#9986 L2 |
|
| Nach oben |
|
|
|
|
|
|
|
|
|
|
| Autor |
Nachricht |
g_boxwood
Anmeldungsdatum: 08.06.2006
Beiträge: 172
|
| Verfasst am: Fr 28 Mai 2010, 11:54 Titel: |
|
|
The channels are common tubing (LOC 38 mm MMT in this setup) that are reinforced with a number of ply bulkheads and that carry some sort of tubing to route the e-match leads to the channel base.
depending on your BP canister its holder may vary: I used a spent Estes 18 mm motor to hold my 2 Safe-Ejects.
I also used expanding foam to stiff the entire channel:
_________________
Giacomo 'g_boxwood' Bosso
TRA#9986 L2 |
|
| Nach oben |
|
|
|
|
|
|
|
|
|
|
| Autor |
Nachricht |
g_boxwood
Anmeldungsdatum: 08.06.2006
Beiträge: 172
|
| Verfasst am: Fr 28 Mai 2010, 11:54 Titel: |
|
|
The channel is then epoxied inside the airframe, fillets are added...
... as well as a layer of glass cloth:

I opted for redundancy and that's why 2 channels are provided:
_________________
Giacomo 'g_boxwood' Bosso
TRA#9986 L2 |
|
| Nach oben |
|
|
|
|
|
|
|
|
|
|
| Autor |
Nachricht |
Juerg
Site Admin

Anmeldungsdatum: 27.02.2005
Beiträge: 4545
Wohnort: Oberengstringen
|
| Verfasst am: Fr 28 Mai 2010, 15:18 Titel: |
|
|
 Looks exactly like my SRM instructions... (but better quality, we need to negotiate about a licensed version for use with the SRM Looks exactly like my SRM instructions... (but better quality, we need to negotiate about a licensed version for use with the SRM  ) )
What are you using when drawing those graphics?
Cheers
Juerg
_________________
http://www.SpacetecRocketry.com |
|
| Nach oben |
|
|
|
|
|
|
|
|
|
|
| Autor |
Nachricht |
g_boxwood
Anmeldungsdatum: 08.06.2006
Beiträge: 172
|
| Verfasst am: Fr 28 Mai 2010, 15:41 Titel: |
|
|
| Juerg hat folgendes geschrieben: | | Looks exactly like my SRM instructions... |
... and the reason is simple: you told me how to do it the first time!
I'll post some variants I came up with to see if a few details can be improved as soon as I have the graphics ready.
Some of those "details" were inspired by your models again.
I'm drawing in Rhino and rendering in Penguin (non-photorealistic).
BTW, if you're interested in the pictures, just tell me what you want and I'll render specific views for the SRM manual. Is there anywhere I can find it to check it out?
Thank you,
_________________
Giacomo 'g_boxwood' Bosso
TRA#9986 L2 |
|
| Nach oben |
|
|
|
|
|
|
|
|
|
|
| Autor |
Nachricht |
Juerg
Site Admin
Anmeldungsdatum: 27.02.2005
Beiträge: 4545
Wohnort: Oberengstringen
|
| Verfasst am: Fr 28 Mai 2010, 21:46 Titel: |
|
|
Actually I could use all of them, just a slight modification (ARRD -> SRM) is needed and maybe mentioning the SafeBag (TM)
I'll get back...
I like just that the rendering is "graphic" and not "foto-realistic"!
Cheers
Juerg
_________________
http://www.SpacetecRocketry.com |
|
| Nach oben |
|
|
|
|
|
|
|
|
|
|
| Autor |
Nachricht |
g_boxwood
Anmeldungsdatum: 08.06.2006
Beiträge: 172
|
| Verfasst am: Sa 29 Mai 2010, 9:43 Titel: |
|
|
Dealing with photo-realistic renderings requires "physical" time for the rendering itself and "conceptual" time to assign the right properties (material and photometric) to each object in the 3D model.
If you miss something or simply don't get it right at the first time, it will cost you time and patience and I simply don't find it useful for such drawings.
That's the reason why I switched to cartoon-style renders almost 3 years ago.
Actually I was thinking about acquiring a SRM so I can use it and model it correctly: let me know.
_________________
Giacomo 'g_boxwood' Bosso
TRA#9986 L2 |
|
| Nach oben |
|
|
|
|
|
|
|
|
|
|
| Autor |
Nachricht |
g_boxwood
Anmeldungsdatum: 08.06.2006
Beiträge: 172
|
| Verfasst am: Mo 31 Mai 2010, 12:47 Titel: |
|
|
Now I have the chance to introduce some mishaps of the design I described earlier:
That's the Big Nuke airframe setup for her first 2 successful flights:

Flight preparation and recovery system reliability may still be improved in many ways.
Let's take a look.
The way I designed the channels implies that the e-match wire leads exit from the channel bottom and go to terminal blocks that route the signal through the bulkplate.
Picture shows "floating" wire leads and terminal blocks (green circles):
Having "floating" wires doesn't leave me happy even after 100% flight success. Basically the main chute shock cord and the main itself sit onto the wires: there shouldn't be any problem as long as the recovery items don't move but... they do!
At ignition the main chute and shock cord compress toward the bulkplate.
At burnout they move forward abruptly: if the shock cord tangles into the wires it could pull them off the terminal blocks or simply break the thin solid copper.
Due to the e-bay design (which is accessible from above only) those leads need to be quite long: they're connected to the terminal blocks with the airframe sections apart; those sections are joined next and I can assure you that it is a 4 hands job!
The channels cannot sit against the bulkplate as the wire leads must be allowed to exit and bend toward the terminal block: the green area is the suggested clearance.
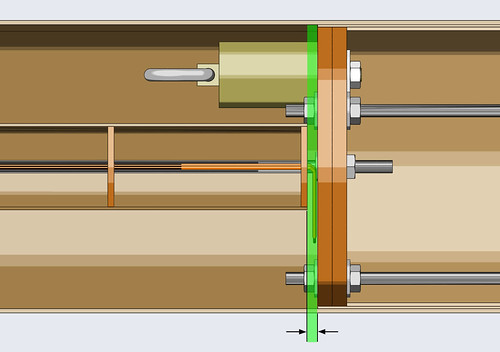
The clearance should be enough for the wire to bend without strain but it shouldn't be too much or the shock cord may slip under the channel and break it off under pull.
I'm thinking out loud about all the possible failure modes of the system and I'll provide what I feel may solve each of them by re-designing the system or details of it.
Let's sum up the problems so far:
1. e-bay access (from above only, no side hatch)
2. floating wires
3. recovery system components allowed to move inside the airframe
In addition.
4. If the airframe section is fairly long, the e-match leads may require some lengthening
5. BP calculations are made as if the entire volume were empty: larger-than-required BP charges are computed. Ground-testing aid in finding the correct BP amount though.
I'll try to anticipate some of the improvements:
1. design the e-bay so that you can access it through a side hatch
2. avoid terminal blocks and route the wires through the bulkplate directly
3. separate by physical means the drogue compartment from the main compartment (it solves 5. as well)
4. avoid mounting the BP canister on top of the channel: mount it onto the bulkplate and route the ejection gasses (by means of the channel) instead of the wires (it solves 2. as well)
I will describe those improvements in details.
_________________
Giacomo 'g_boxwood' Bosso
TRA#9986 L2 |
|
| Nach oben |
|
|
|
|
|
|
|
|
|
|
| Autor |
Nachricht |
g_boxwood
Anmeldungsdatum: 08.06.2006
Beiträge: 172
|
|
| Nach oben |
|
|
|
|
|
|
|
|
|
|
| Autor |
Nachricht |
g_boxwood
Anmeldungsdatum: 08.06.2006
Beiträge: 172
|
|
| Nach oben |
|
|
|
|
|
|
|
|
|
|
| Autor |
Nachricht |
Juerg
Site Admin
Anmeldungsdatum: 27.02.2005
Beiträge: 4545
Wohnort: Oberengstringen
|
| Verfasst am: Mo 12 Jul 2010, 19:05 Titel: |
|
|
Hi Giacomo
This looks great. I'll send you the drawing right after, sorry for that delay. But no need to change anything on that rendering, it's even more accurate than needed.
I just have way too many things to cover currently 
Thanks a lot
Juerg
_________________
http://www.SpacetecRocketry.com |
|
| Nach oben |
|
|
|
|
|
|
|
|
|
|
| Autor |
Nachricht |
g_boxwood
Anmeldungsdatum: 08.06.2006
Beiträge: 172
|
| Verfasst am: Di 13 Jul 2010, 19:11 Titel: |
|
|
Juergh: if it suits you there's no need for the drawings.
I'll provide the render in full res.
All I have to do extra is the 2 pictures showing the "F/2 methods".
_________________
Giacomo 'g_boxwood' Bosso
TRA#9986 L2 |
|
| Nach oben |
|
|
|
|
|
|
|
|
|
|
|
|
Du kannst keine Beiträge in dieses Forum schreiben.
Du kannst auf Beiträge in diesem Forum nicht antworten.
Du kannst deine Beiträge in diesem Forum nicht bearbeiten.
Du kannst deine Beiträge in diesem Forum nicht löschen.
Du kannst an Umfragen in diesem Forum nicht mitmachen.
Du kannst Dateien in diesem Forum nicht posten
Du kannst Dateien in diesem Forum herunterladen
|
|
|
|
|
|
|
|