FAQFAQ SuchenSuchen MitgliederlisteMitgliederliste BenutzergruppenBenutzergruppen  RegistrierenRegistrieren  ProfilProfil Einloggen, um private Nachrichten zu lesenP.M. LoginLogin
Apollo LES 4"
Gehe zu Seite Zurück  1, 2, 3, 4, 5, 6, 7, 8  Weiter
 
Neues Thema eröffnen   Neue Antwort erstellen    EURocketry Foren-Übersicht -> Scale Modellbau
Vorheriges Thema anzeigen :: Nächstes Thema anzeigen  

Autor Nachricht
Marxi


Anmeldungsdatum: 15.04.2005
Beiträge: 200
Wohnort: Passau

BeitragVerfasst am: Mo 09 Feb 2009, 12:51    Titel: Antworten mit Zitat

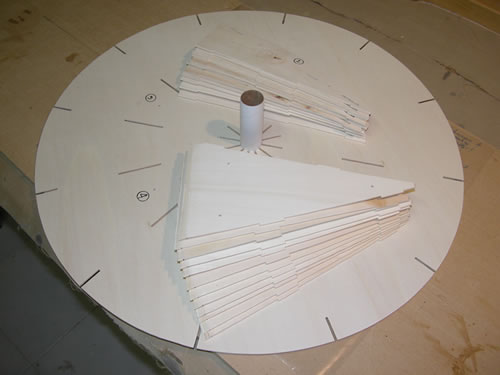
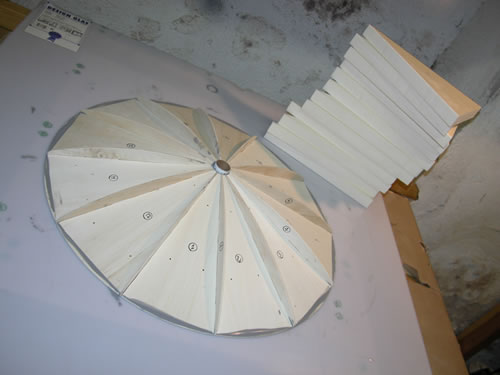
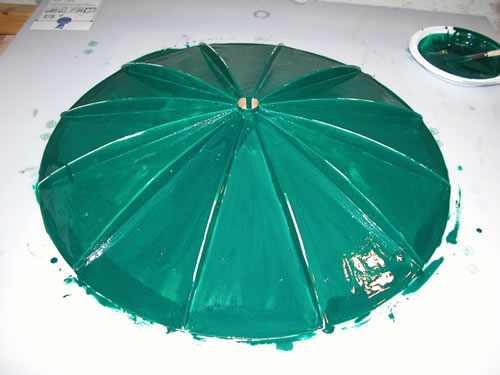
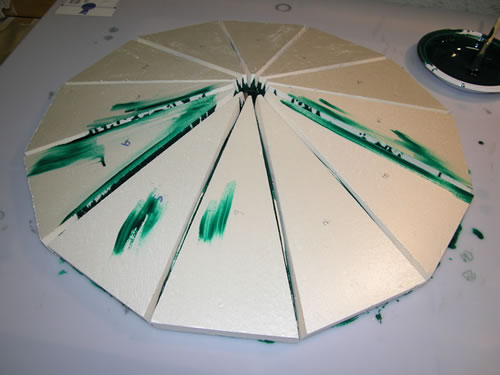
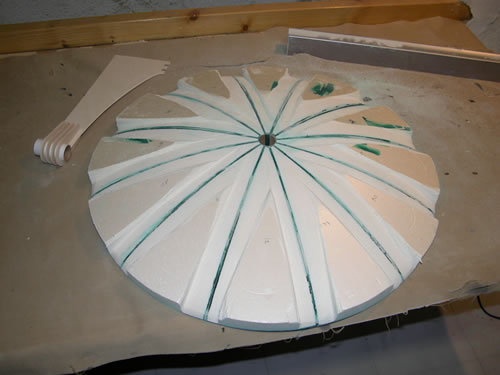
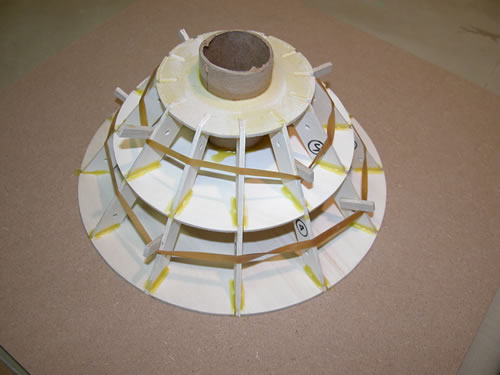
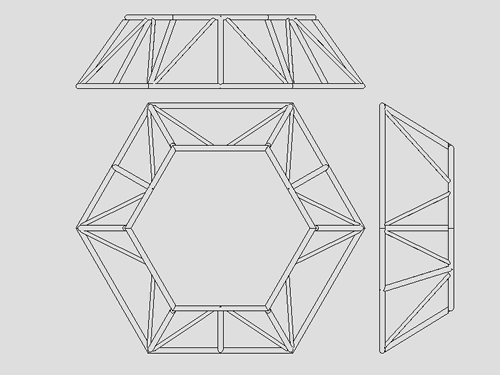
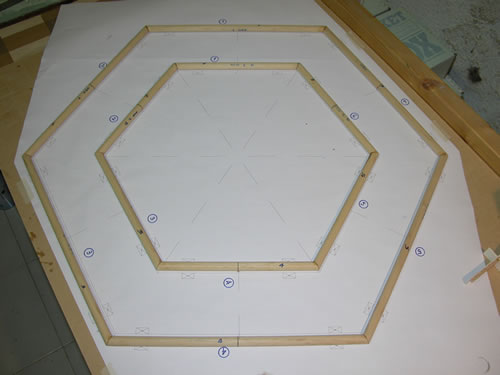
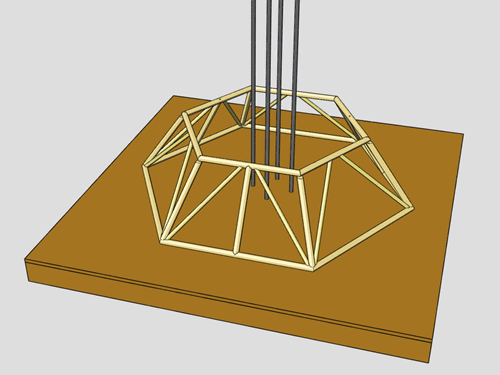
Excellent craftmanship!

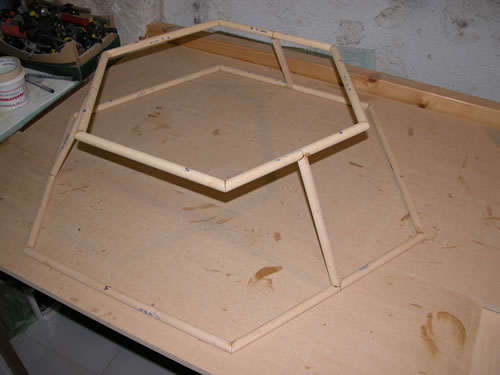
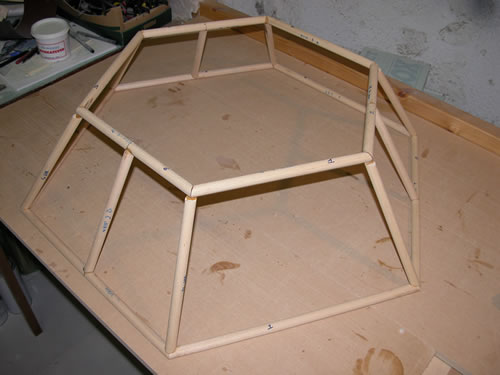
I think, the rod setup will hold up fine - just make sure, all the motors light!

By the way - any plans on motors yet?
Nach oben
Benutzer-Profile anzeigen Private Nachricht senden
Autor Nachricht
Juerg
Site Admin


Anmeldungsdatum: 27.02.2005
Beiträge: 4545
Wohnort: Oberengstringen

BeitragVerfasst am: Mo 09 Feb 2009, 13:44    Titel:
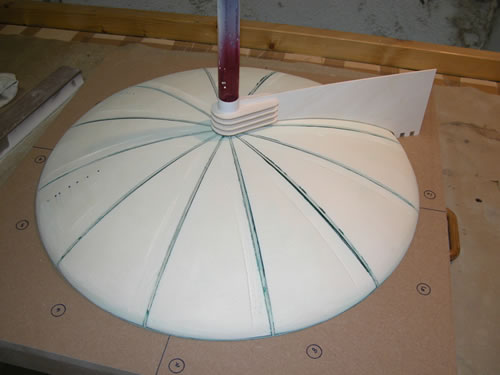
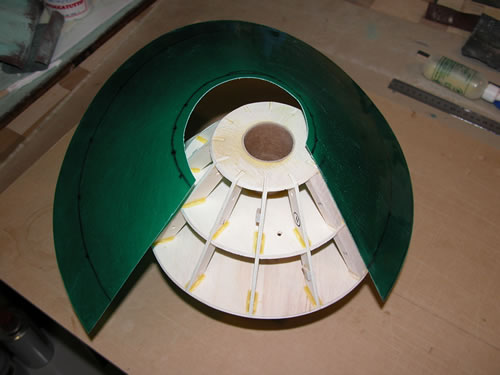
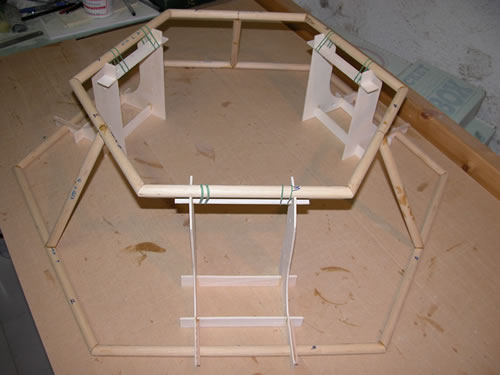
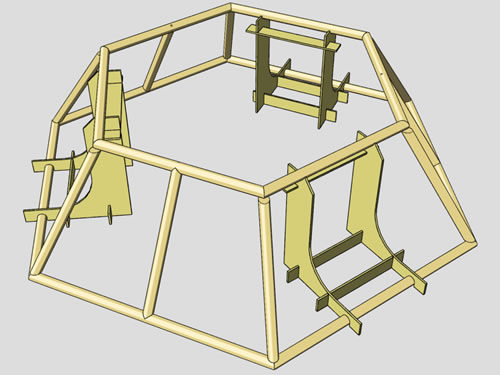
 Antworten mit Zitat

g_boxwood hat folgendes geschrieben:
I was a bit worried about it due to the unusual design and cluster requirements.

Cluster shouldn't be that big of a problem, using the right igniters (thermite).
See Rolli's Shuttle that lit 2 I211 simultanously.
I can supply those if you have need, all I need to know is the motor size.

I think the setup isn't critical at all.

Juerg

_________________
http://www.SpacetecRocketry.com
Nach oben
Benutzer-Profile anzeigen Private Nachricht senden E-Mail senden Website dieses Benutzers besuchen MSN Messenger
Autor Nachricht
g_boxwood


Anmeldungsdatum: 08.06.2006
Beiträge: 172

BeitragVerfasst am: Mo 09 Feb 2009, 21:30    Titel: Antworten mit Zitat

Perfect then.

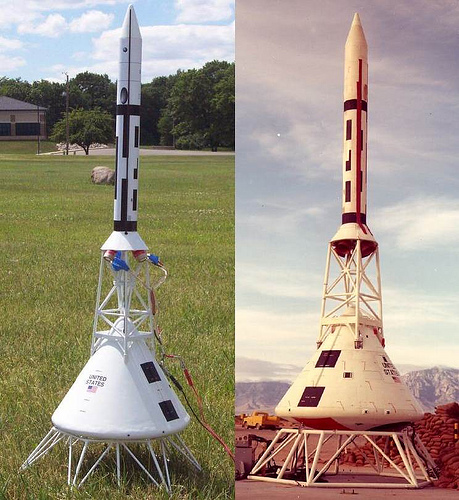
I211s are my dream selection of course, followed by Cesaroni Pro38 3 grain I170s, which would be easier to lit for sure but not as pleasant to the eye as the 211s.

_________________
Giacomo 'g_boxwood' Bosso
TRA#9986 L2
Nach oben
Benutzer-Profile anzeigen Private Nachricht senden
Autor Nachricht
Juerg
Site Admin


Anmeldungsdatum: 27.02.2005
Beiträge: 4545
Wohnort: Oberengstringen

BeitragVerfasst am: Di 10 Feb 2009, 8:51    Titel: Antworten mit Zitat

Well, actually, an I211 plus a Black Powder pellet is as easy to light as a CTI motor.
But I'd suggest Termite igniters, that's even faster.

Take care

Juerg

_________________
http://www.SpacetecRocketry.com
Nach oben
Benutzer-Profile anzeigen Private Nachricht senden E-Mail senden Website dieses Benutzers besuchen MSN Messenger
Autor Nachricht
g_boxwood


Anmeldungsdatum: 08.06.2006
Beiträge: 172

BeitragVerfasst am: Mi 11 Feb 2009, 15:31    Titel: Antworten mit Zitat

I was finally able to get back to the bench: it took me monday and yesterday to cut the parts for the heatshield frame {pic.1} and to put them together {pic.2}.

Today I added the foam blocks {pic.3 & 4}.


DSCN8409.jpg
 Beschreibung:
 Dateigröße:  21.11 KB
 Angeschaut:  2979 mal

DSCN8409.jpg


DSCN8419.jpg
 Beschreibung:
 Dateigröße:  22.33 KB
 Angeschaut:  2979 mal

DSCN8419.jpg


DSCN8423.jpg
 Beschreibung:
 Dateigröße:  34.47 KB
 Angeschaut:  2979 mal

DSCN8423.jpg


DSCN8424.jpg
 Beschreibung:
 Dateigröße:  28.36 KB
 Angeschaut:  2979 mal

DSCN8424.jpg


_________________
Giacomo 'g_boxwood' Bosso
TRA#9986 L2
Nach oben
Benutzer-Profile anzeigen Private Nachricht senden
Autor Nachricht
g_boxwood


Anmeldungsdatum: 08.06.2006
Beiträge: 172

BeitragVerfasst am: Fr 13 Feb 2009, 18:35    Titel: Antworten mit Zitat

Here we go again! Pretty hard-working days!

I started by removing the excess foam just across the vertical members as they provided a sorta guide {pic.1}.

Allt the rest was just a matter of time and patience, I used the rotating spatula as a shaping gauge {pic.2}.

The first epoxy batch was all about filling but I didn't get the result I was expecting... {pic.3}... and after the glass cloth layer the finish looked 'less' than perfect {pic.4}.


DSCN8432.jpg
 Beschreibung:
 Dateigröße:  27.36 KB
 Angeschaut:  2941 mal

DSCN8432.jpg


DSCN8438.jpg
 Beschreibung:
 Dateigröße:  24.13 KB
 Angeschaut:  2941 mal

DSCN8438.jpg


DSCN8445.jpg
 Beschreibung:
 Dateigröße:  20.96 KB
 Angeschaut:  2941 mal

DSCN8445.jpg


DSCN8451.jpg
 Beschreibung:
 Dateigröße:  34.34 KB
 Angeschaut:  2941 mal

DSCN8451.jpg


_________________
Giacomo 'g_boxwood' Bosso
TRA#9986 L2
Nach oben
Benutzer-Profile anzeigen Private Nachricht senden
Autor Nachricht
g_boxwood


Anmeldungsdatum: 08.06.2006
Beiträge: 172

BeitragVerfasst am: Fr 13 Feb 2009, 19:17    Titel: Antworten mit Zitat

I matched the 2 parts together and only 90° out of 360° aligned... {pic.1}... so the other 270° were shaped in situ with 2-part automotive filler {pic.2-3-4}.

Filling ans sanding continues...


DSCN8456.jpg
 Beschreibung:
 Dateigröße:  23.55 KB
 Angeschaut:  2930 mal

DSCN8456.jpg


DSCN8467.jpg
 Beschreibung:
 Dateigröße:  24.8 KB
 Angeschaut:  2930 mal

DSCN8467.jpg


DSCN8464.jpg
 Beschreibung:
 Dateigröße:  23.47 KB
 Angeschaut:  2930 mal

DSCN8464.jpg


DSCN8461.jpg
 Beschreibung:
 Dateigröße:  38.95 KB
 Angeschaut:  2930 mal

DSCN8461.jpg


_________________
Giacomo 'g_boxwood' Bosso
TRA#9986 L2
Nach oben
Benutzer-Profile anzeigen Private Nachricht senden
Autor Nachricht
MikeHB


Anmeldungsdatum: 16.07.2005
Beiträge: 157
Wohnort: Bremen

BeitragVerfasst am: Sa 14 Feb 2009, 15:55    Titel: Antworten mit Zitat

My goodness, I believe you will make it to the moon until this decade is out, will you?

Stunning,
Michael

_________________
Sagt Abraham zu Bebraham: Kann ich mal Dein Cebra ham?
Nach oben
Benutzer-Profile anzeigen Private Nachricht senden Website dieses Benutzers besuchen MSN Messenger
Autor Nachricht
g_boxwood


Anmeldungsdatum: 08.06.2006
Beiträge: 172

BeitragVerfasst am: So 01 März 2009, 15:46    Titel: Antworten mit Zitat

Thanks Mike, very kind of you!

I spent most of the workshop time filling and sanding the heatshield until I got a tad obsessive with it...

I put it aside for a while and I concentrated on 2 more items I needed: the booster motor transition (BMT) mold and the launch base.

The Booster Motor Transition mold

It is the last mold I need, the easiest and the smallest one. It features 3 centering rings on a 38mm tube and 12 stringers {pic.1}: note the temporary balsa sticks used to anchor the rubber bands while the aliphatic dries.

The cleaned up frame {pic.2} is rolled over the glass cloth to find the right skin pattern {pic.3}.

The 2 fiberglass layers are then laminated flat and cut to shape before wrapping them around the frame {pic.4}.

The joining line is supported with 3/8" balsa sticks to provide a wider mating surface.


DSCN8472.jpg
 Beschreibung:
 Dateigröße:  28.12 KB
 Angeschaut:  2832 mal

DSCN8472.jpg


DSCN8477.jpg
 Beschreibung:
 Dateigröße:  25.55 KB
 Angeschaut:  2832 mal

DSCN8477.jpg


DSCN8480.jpg
 Beschreibung:
 Dateigröße:  32.27 KB
 Angeschaut:  2832 mal

DSCN8480.jpg


DSCN8489.jpg
 Beschreibung:
 Dateigröße:  28.72 KB
 Angeschaut:  2832 mal

DSCN8489.jpg


_________________
Giacomo 'g_boxwood' Bosso
TRA#9986 L2
Nach oben
Benutzer-Profile anzeigen Private Nachricht senden
Autor Nachricht
g_boxwood


Anmeldungsdatum: 08.06.2006
Beiträge: 172

BeitragVerfasst am: So 01 März 2009, 15:58    Titel: Antworten mit Zitat

The Launch Base
I basically got all the infos I needed from the {pic.1}.

Some CAD work was necessary to achieve the appropriate design {pic.2-3}.

The framing is simple, light and strong, all the members but the diagonal braces are 15 mm dowels, the diagonal braces are 10 mm.

Putting the framing together is pretty simple provided you make some custom jigs to cut all the members to the required length and to the appropriate mating angles!

The base and top hexagons are put together first over the plans {pic.4}: you can't see it but the joint is internally supported by a brass rod.


2869435719_cdb952d97a.jpg
 Beschreibung:
 Dateigröße:  144.64 KB
 Angeschaut:  2830 mal

2869435719_cdb952d97a.jpg


2008-02-28_01.jpg
 Beschreibung:
 Dateigröße:  41.6 KB
 Angeschaut:  2830 mal

2008-02-28_01.jpg


2008-02-28_03.gif
 Beschreibung:
 Dateigröße:  19.68 KB
 Angeschaut:  2830 mal

2008-02-28_03.gif


DSCN8494.jpg
 Beschreibung:
 Dateigröße:  23.52 KB
 Angeschaut:  2830 mal

DSCN8494.jpg


_________________
Giacomo 'g_boxwood' Bosso
TRA#9986 L2
Nach oben
Benutzer-Profile anzeigen Private Nachricht senden
Autor Nachricht
g_boxwood


Anmeldungsdatum: 08.06.2006
Beiträge: 172

BeitragVerfasst am: So 01 März 2009, 16:09    Titel: Antworten mit Zitat

Next came the mid members, shown in {pic.1} with their cutting and shaping jig.

Mid members as well are supported by a brass rod: the hole is drilled to the appropriate angle using a simple yet effective jig {pic.2}.

Mid members provide the first useful link betwen base and top hexagons{pic.3}.

The jig in {pic.4} was designed to aid in the correct positioning of the hexagons.


DSCN8500.jpg
 Beschreibung:
 Dateigröße:  28.82 KB
 Angeschaut:  2827 mal

DSCN8500.jpg


DSCN8506.jpg
 Beschreibung:
 Dateigröße:  30.23 KB
 Angeschaut:  2827 mal

DSCN8506.jpg


DSCN8514.jpg
 Beschreibung:
 Dateigröße:  27.63 KB
 Angeschaut:  2827 mal

DSCN8514.jpg


2008-02-28_02.jpg
 Beschreibung:
 Dateigröße:  35.67 KB
 Angeschaut:  2827 mal

2008-02-28_02.jpg


_________________
Giacomo 'g_boxwood' Bosso
TRA#9986 L2
Nach oben
Benutzer-Profile anzeigen Private Nachricht senden
Autor Nachricht
g_boxwood


Anmeldungsdatum: 08.06.2006
Beiträge: 172

BeitragVerfasst am: So 01 März 2009, 16:15    Titel: Antworten mit Zitat

The jig prooved right and the results are satisying {pic.1-2-3}.

I next added the 6 vertex members {pic.4}.


DSCN8525.jpg
 Beschreibung:
 Dateigröße:  21.31 KB
 Angeschaut:  2824 mal

DSCN8525.jpg


DSCN8515.jpg
 Beschreibung:
 Dateigröße:  27.82 KB
 Angeschaut:  2824 mal

DSCN8515.jpg


DSCN8519.jpg
 Beschreibung:
 Dateigröße:  26.89 KB
 Angeschaut:  2824 mal

DSCN8519.jpg


DSCN8520.jpg
 Beschreibung:
 Dateigröße:  27.96 KB
 Angeschaut:  2824 mal

DSCN8520.jpg


_________________
Giacomo 'g_boxwood' Bosso
TRA#9986 L2
Nach oben
Benutzer-Profile anzeigen Private Nachricht senden
Autor Nachricht
g_boxwood


Anmeldungsdatum: 08.06.2006
Beiträge: 172

BeitragVerfasst am: Mo 02 März 2009, 16:28    Titel: Antworten mit Zitat

Ok, I left you with the base almost done but for the diagonal braces. In fact, they are the thoughest members to cut and shape but given the right jig they can be done!

The jig is simple and it guides both the cutting and the shaping of both ends; you can see it at the top right corner of {pic. 1}.

The degree of cleaness achievable with such a simple tool is enough for the joint {pic. 2-3}.


DSCN8526.jpg
 Beschreibung:
 Dateigröße:  27.53 KB
 Angeschaut:  2782 mal

DSCN8526.jpg


DSCN8531.jpg
 Beschreibung:
 Dateigröße:  26 KB
 Angeschaut:  2782 mal

DSCN8531.jpg


DSCN8528.jpg
 Beschreibung:
 Dateigröße:  25.17 KB
 Angeschaut:  2782 mal

DSCN8528.jpg


_________________
Giacomo 'g_boxwood' Bosso
TRA#9986 L2
Nach oben
Benutzer-Profile anzeigen Private Nachricht senden
Autor Nachricht
g_boxwood


Anmeldungsdatum: 08.06.2006
Beiträge: 172

BeitragVerfasst am: Mo 02 März 2009, 16:47    Titel: Antworten mit Zitat

The pad is done, minor work is required to fill some gaps and weather-proof it {pic.1-2}.

I added some brass inserts to 3 of the 6 horizontal base members: the launch stand will be joined to a MDF base I'll be developing in the future. This way the launch stand will be above the soil and will rest flat on the board: the board will provide a rock-solid anchoring for the launch rods and will avoid warping the stand due to the terrain uneveness {pic.3-4}.


DSCN8539.jpg
 Beschreibung:
 Dateigröße:  30.39 KB
 Angeschaut:  2780 mal

DSCN8539.jpg


DSCN8540.jpg
 Beschreibung:
 Dateigröße:  31.17 KB
 Angeschaut:  2780 mal

DSCN8540.jpg


DSCN8536.jpg
 Beschreibung:
 Dateigröße:  17.59 KB
 Angeschaut:  2780 mal

DSCN8536.jpg


2009-03-02_01.gif
 Beschreibung:
 Dateigröße:  29.34 KB
 Angeschaut:  2780 mal

2009-03-02_01.gif


_________________
Giacomo 'g_boxwood' Bosso
TRA#9986 L2
Nach oben
Benutzer-Profile anzeigen Private Nachricht senden
Autor Nachricht
Juerg
Site Admin


Anmeldungsdatum: 27.02.2005
Beiträge: 4545
Wohnort: Oberengstringen

BeitragVerfasst am: Mo 02 März 2009, 22:11    Titel: Antworten mit Zitat

Amazing Giacomo!

Cant wait to see that in person!

Cheers

Juerg

_________________
http://www.SpacetecRocketry.com
Nach oben
Benutzer-Profile anzeigen Private Nachricht senden E-Mail senden Website dieses Benutzers besuchen MSN Messenger
Beiträge der letzten Zeit anzeigen:   
Neues Thema eröffnen   Neue Antwort erstellen    EURocketry Foren-Übersicht -> Scale Modellbau Alle Zeiten sind GMT + 2 Stunden
Gehe zu Seite Zurück  1, 2, 3, 4, 5, 6, 7, 8  Weiter
Seite 3 von 8
Gehe zu:  
Du kannst keine Beiträge in dieses Forum schreiben.
Du kannst auf Beiträge in diesem Forum nicht antworten.
Du kannst deine Beiträge in diesem Forum nicht bearbeiten.
Du kannst deine Beiträge in diesem Forum nicht löschen.
Du kannst an Umfragen in diesem Forum nicht mitmachen.
Du kannst Dateien in diesem Forum nicht posten
Du kannst Dateien in diesem Forum herunterladen

Powered by phpBB © 2001, 2002 phpBB Group
mtechnik